Detailed step by step instructions for this How-To: 2005-06 Fog Light Modification coming soon... I'm working on all the steps, arranging all the pictures in order, etc... at the moment... I should have this thread 100% complete by this evening. Thanks for your patience in the mean time!
Well my fog light mod is complete and here is the final picture result... I've done a step by step photo of this process from every nut and bolt, to wire and tap so a extremely detailed write up will be posted soon... I base my write ups towards someone thats completely retarded (no offense intended) to be able to complete the task. If your 5 year old child who's never seen a car before can't follow my write up instructions, then I haven't written them good enough... Anyhow, I’m gonna break this mod down into three separate ways to do this. The first one is the way I personally completed this mod which is definitely the most time consuming of the three, the following two show easier methods of completing this modification. The second way is basically the exact same as the first, though a top view of doing things. Finally the third way is another option towards completing this mod, however I’ve heard that in some cases if the fog light button is left on, your fog lights will sometime have a tendency to flicker on/off after 4-6 hours of sitting… strange I know… Personally, Option #2 is the best/easiest way to complete this modification, however Option #1 (the way I personally did mine) is the cleanest of them all.
SO LETS GET STARTED, OPTION #1: (Clicking on each image will enlarge them for more detail)
Parts/Tools that you will need:
- Ratchet
- 10mm Socket
- 12mm Socket
- Optional: Long Extension
- Flat Head Screwdriver
- Pliers
- Wire Strippers
- (1) Male Butt Connector
- (1) Female Splice Connector
- Optional: Extra Wire (I didn’t use any personally)
STEP #1
Remove battery… To do this, you’ll need to remove the single 10mm nut that’s closest to the front of the truck. The two battery terminals (both positive (+) wire and ground wire (-) require a 10mm socket as well to remove. WARNING: DO NOT TOUCH THE POSITIVE (+) AND NEGATIVE (-) CABLES TOGETHER…THEY WILL SHOCK YOU BELIEVE IT OR NOT). Once you’ve removed the bracket nut, and have the the positive and negative battery cables moved a side, remove the battery bracket and pull the battery out. You honestly don’t need to remove the battery though it will made the job easier when it comes to reaching certain bolts, moving around the fuse block, etc..
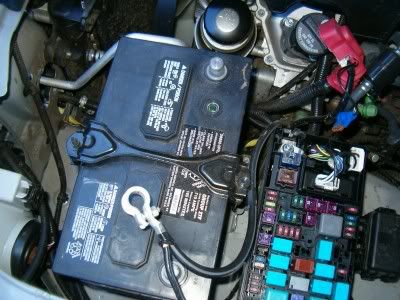
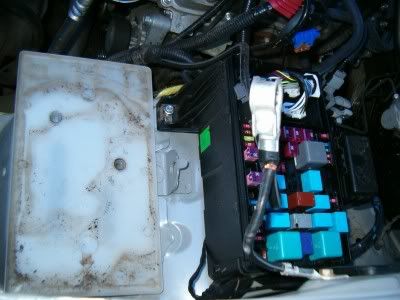
STEP #2
Remove the fuse panel cover so you can see all your individual fuses. There is a clip on the firewall (right) side of the black cover that you’ll need to pry back to get the cover off.

STEP #3
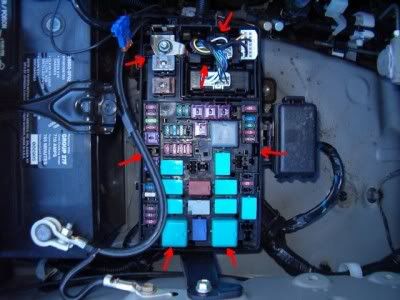
Remove the (3) 10mm nuts that hold the actual fuse panel in place.
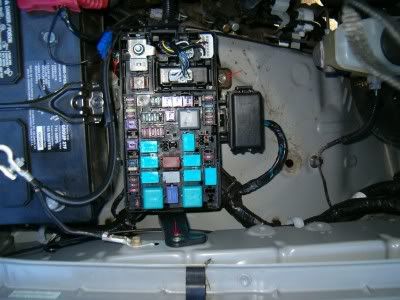
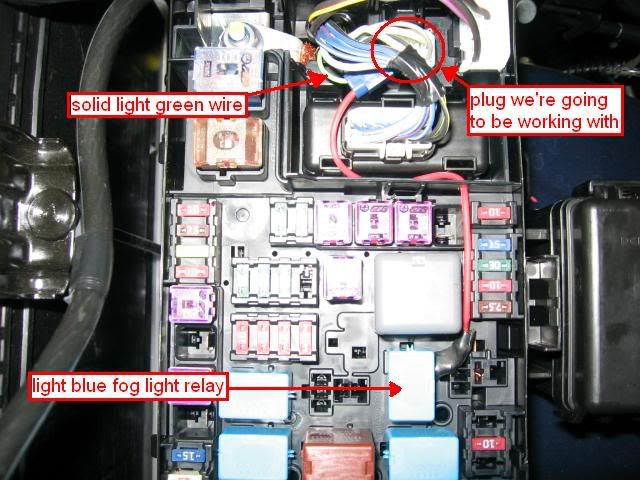
STEP #4
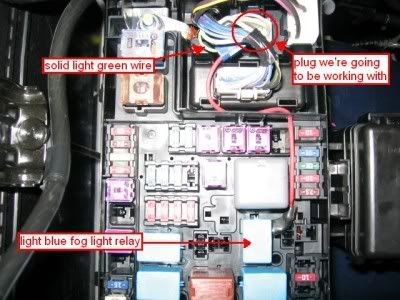
Unplug the three plugs at the top of the box… there are (2) plugs that are about a inch long or so, and a smaller 6 pin pug that’s roughly a half inch wide… Note where this plug is. There is a SOLID LIGHT GREEN wire on this plug that we’ll be concentrating later on..
STEP #5
Once the three plugs are removed, you’ll want to release a piece on the top of the box that the those three plugs come through… to do this, there are two tabs, one on each side that you’ll have to pull outward… once you have both tabs pulled outward you’ll be able to slide that section of the box upward to move it out of the way….
STEP #6
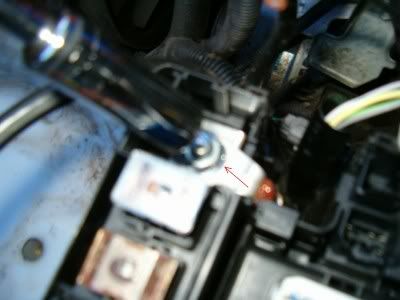
Remove the 12mm nut located on the top left side of the box. Once this is removed, you should be able to slide the 3 plugs completely out of the way.
STEP #7
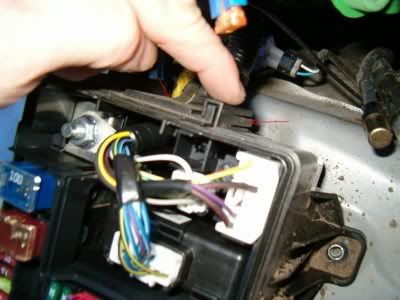
Now the harder part…. Be patient with this one because this is by far the hardest, most frustrating part of the entire modification. Now that all plugs are unplugged and moved away from the fuse panel, you’ll have to use your flat head screw driver and wedge the tabs located around the entire fuse panel. While wedging the tabs, you’ll want to wiggle/slide the entire fuse panel upward. The fun part is, the fuse panel won’t slide easily so you’ll have to use your favorite curse words several times until you have the panel released..
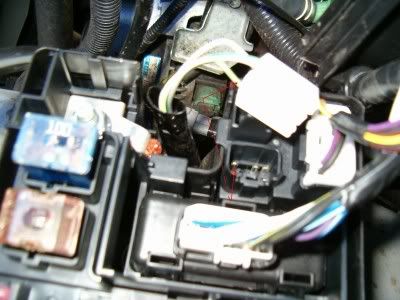
STEP #8
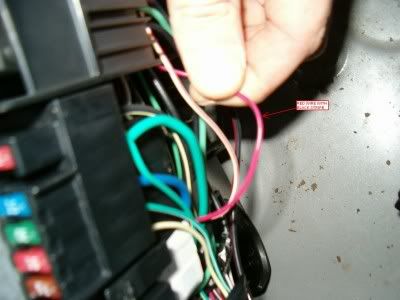
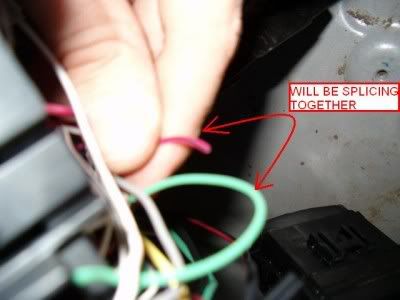
Once you have the panel slid up where you can see all the wires underneath (you’ll have to jimmy the entire panel around using a decent amount of force), you’ll want to find a thin SOLID RED WIRE WITH BLACK STRIPE that leads to where the upper right pin location from the actual blue fog light relay. This particular wire is located sorta near the right edge of the panel and runs upward near the location of the 3 larger plugs we removed in step #4.
STEP #9
Once you’ve found the correct RED WIRE WITH BLACK STRIPE you’ll want to find roughly the middle of the wire and cut it in half… You’ll cap off the side of the wire that leads to the top portion of the fuse box and the other half we’ll be using to slice into a light green wire but we’ll come back to that in a second.

STEP #10
Find the SOLID GREEN WIRE… to do this you might want to scroll back up to step #4 and see where the Plug/Pin location is so you’ll have a reference point. Looking under the fuse panel, the SOLID LIGHT GREEN wire will be located pretty much in the middle of the upper portion of the entire panel… By noting Step #4 and where the plug/pins should be, you’ll be able to find this wire fairly easily.
STEP #11
Once you’ve found the LIGHT GREEN WIRE and you have the RED WITH BLACK SPRIPED wire cut in half, you’ll want to follow the green down to roughly its half way spot where you’ll be adding a female butt connector to… Make sure if you’re not using any extra wire, that your red wire will be able to reach where you’re putting your female connector on the green wire.
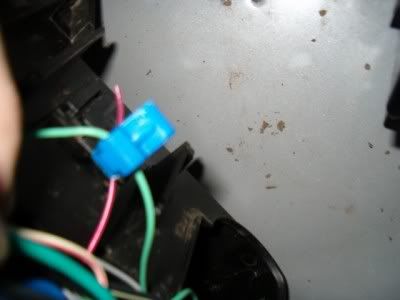
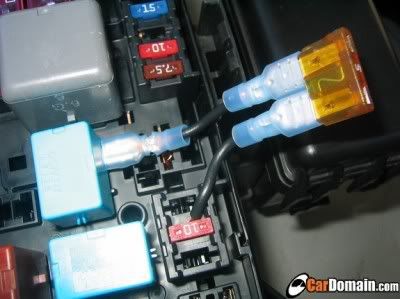
STEP #12
Now put your Male butt connector on the end of the red/black wire that leads to where the fog light relay will be plugged into.
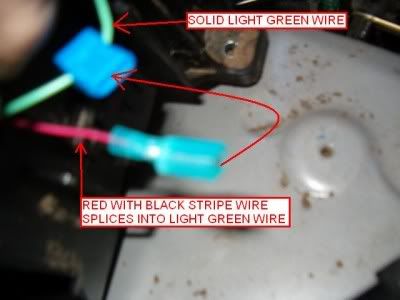
STEP #13
Once you have both your connectors attached, plug the red wire into the green wire… Now your wiring job is complete and you’ll be ready to start putting everything back in its original condition.
STEP #14
Tuck your all your wires back in and you can start sliding your fuse panel back into its box. Once you have your fuse panel snapped back into its box, I personally plugged in everything (remember to attach the cable to the 12mm nut location from step #6), attached the cables to the battery and started the truck just to make sure everything worked correctly…
STEP #15
Once you’ve double checked that everything is working properly, the fog

OPTION #1: FINAL PRODUCT/LOOK

NOW TO OPTION #2 (Same as #1, only the from above):
Parts/Tools that you will need:
- Wire Strippers
- (1) Male Butt Connector
- (1) Female Butt Connector
- (1) Female Splice Connector
- Approximately 1 Foot of wire (pretty much any gauge wire will work, doesn’t have to be anything crazy thick… 16-20 gauge is just fine)
- Small drill bit and power/cordless drill
STEPS #1-5
Basically what you’re doing here is removing the light blue fog light relay which is located in the center/right side of the fuse panel under the 1”x1” light gray relay. Once you’ve found the correct light blue relay, remove it and bend over the TOP RIGHT PIN of the replay. Add a female butt connector to the end of your spare wire and plug it into the pin that you’ve bent over from your relay… Plug your relay back into its location. Now, run your wire up towards the top of the fuse panel. You’ll notice you’ll have to go through a thin wall of black plastic to gain access into the location of the three plugs. Drill your small hole so you can continue to run your wire to the 6-pin small white plug that we’re aiming for. Once you’ve got your wire up near the 6-pin plug, locate the SOLID GREEN WIRE which is the top left corner of the actual plug. Use your female splice connector/male butt connector to splice your additional wire into the SOLID GREEN WIRE. Now you’re finished with the fog light modification. Place your fuse panels cover back on and enjoy your new free mod.
OPTION #2: FINAL PRODUCT/LOOK
Original image taken from Indigo Taco05 from Toyota Nation.
NOW TO OPTION #3:
Parts/Tools that you will need:
- Wire Strippers
- (3) Female Butt Connector
- Approximately 6 inches of wire (pretty much any gauge wire will work, doesn’t have to be anything crazy thick… 16-20 gauge is just fine)
STEPS #1-5
Find your light blue fog light relay, remove the relay and bend the top right pin from the relay to the side pointing outward, Attach a female butt connector to the bent relay pin. The other end of this wire will run to one side of a 5A fuse. Once you have your wire running from the relay to one end of the fuse, now run a wire from the other side of the fuse to the red 10A fuse that’s located directly to the right of the relays location.. Now you’ve completed this modification. Something you might note doing this modification this way, I’ve heard that in some cases if the fog light button is left on, your fog lights will sometime have a tendency to flicker on/off after 4-6 hours of sitting. The fog lights evidentially will come on for a minute or so then turn off repeating this process every 4-6 hours…
OPTION #3: FINAL PRODUCT/LOOK
Original image taken from Pb2theMax from Toyota Nation.
ganti kode adsense 336x280

0 komentar:
Post a Comment